Showing posts with label Pantry. Show all posts

Sunday, July 20, 2014

Crispy Kosher Dill Pickles

This recipe is based on the Bell Blue Book recipe but it does use less sugar. Do follow proper canning procedures and review a resource if you're new to canning or it's been a while. These pickles are great on burgers, as a side, and can be eaten the next day, but the point of making them is to put them up for later. 

I'm slowly learning how much to make of things in terms of a year's supply now that I have a basement. Pickles are best made with fairly small cucumbers, about 4 to 6-inches long. This size cucumbers can easily be found at farmers markets, roadside stands, and produce auctions. If you take up pickling to any degree, you'll likely find the best deals come from either your own garden or a produce auction. However, I did get this peck (a big box with a handle) at the Athens Farmers Market.


Crispy Kosher Dill Pickles

Yields 3 quarts.

Useful Equipment
Quart jars with lids and bands for pickling
Water bath Pot for canning + canning equipment

Ingredients
  • Cucumbers, 4 to 6-inches, 1 peck, wash, cut in half or quarters lengthwise (depending on size)
  • Water, 1 quart (4 cups)
  • White Vinegar, 1 quart (4 cups)
  • Sugar, 1/2 cup
  • Pickling Salt, 1/2 cup
  • Pickling Spice Mix, 1 Tbsp per pint jar
  • Dill head, 1 per jar
  • Bay Leaf, 1 per jar 
  • Ball Pickle Crisp, 1/4 tsp per quart jar
  • Clove of Garlic, 1 per jar (optional)
  • Dried Chili Pepper, 1 per jar (optional)
Directions
  1. Wash and clean jars and lids. Use new lids. Reuse bands.
  2. Heat jars in oven to 250ºF for 30 minutes.
  3. Bring lids to simmer in pot on the stove.
  4. Over low flame, heat pot for water bath with lid while preparing the pickles.
  5. Rinse, drain, and cut cucumbers.
  6. Add spice mix, dill head, bay leaf, pickle crisp, garlic clove (if using), and chili pepper (if using) to each jar.
  7. Bring pickling juice ingredients: water, vinegar, sugar, and pickling salt to boil over medium heat, stir until sugar and salt dissolve. Pour hot liquid into the jars over the cucumbers and spices. 
  8. Wipe rims with a clean damp cloth.
  9. Place lid.
  10. Seal with band to finger tight (just tight).
  11. Place jars into water bath and bring to boil. Start processing time from when it begins to boil, process for 15 minutes.
  12. Check seals. Anything that doesn’t seal, store in fridge and use within the week.
  13. Label jars.
  14. Use within a year

Thursday, July 17, 2014

Eat Your Vegetables: Quick Pickles

Determined to eat well, we tramp off to the market, buy handfuls of luscious vegetables, and then we stuff the things into the crisper. Later, the once beautiful produce is wilted and no longer looks appetizing. The old veggies are composted, tossed, or maybe made into soup?

Having trouble keeping your vegetables in the edible state? Want another way to add vegetables to your diet? Japan to the rescue!

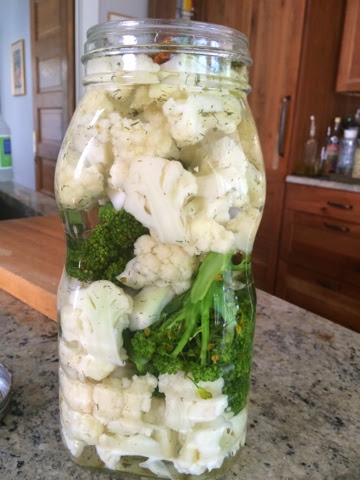
Pickles of varying types are traditionally eaten at every meal in Japan, yes, that includes breakfast. I had previously thought of pickling to be about cucumbers and water baths, but there is more to pickling, and quick pickling is a handy food preservation method. My cooking teacher, Nansai Sensei, demonstrated how to make quick pickles using a variety of vegetables all mixed together in a jar. This is a variation of her recipe then modified for the American pantry.

You can make and eat quick pickles the same day, though they do have a more intense flavor over time. It allows fresh produce to be stored in a ready to eat state that lasts beyond the usual day or two, and it adds texture and the zingy taste of vinegar to your palate.

Vegetables are best when cut into uniform shapes which is helpful for absorbing flavor. Some vegetables, such as cauliflower, beets, broccoli, carrots, and green beans, need a quick boil (1 to 2 minutes) followed by immersion into cold water to stop the cooking process, drain, and place into the hot pickling juice.  (TIP: Cauliflower will stay whiter if boiled with a slice of lemon).

Improvise with spices, use different types of vinegar, and tweak the recipe to your liking. Store quick pickles in a glass jar in the fridge up to 10 days. Now you can add vegetables to your lunch or easily eat them as a snack right out of the fridge. Heck, I serve them at parties. Combine the pickled vegetables with fresh vegetables for a textural and flavorful contrast in a salad.

Enjoy!


Eat Your Vegetables Quick Pickles
Yield 4 pints or 2 quarts

Useful Equipment
Clean glass jar with lid, pint or quart size

Ingredients for Pickling Juice
Water, 1 quart (4 cups)
White Vinegar, 2 cups
Sugar, 1/3 cup
Pickling or Kosher Salt, 2 Tbsp

Spice Options
Pickling Spice Mix, 1 tsp per pint jar
Dried Hot Red Pepper, 1 per jar (optional)
Bay Leaf, 1 per jar (optional)
Clove of Garlic, 1 per jar (optional)
Mustard Seeds, 1/2 tsp per jar (optional)
Ball Pickle Crisp, 1/8 tsp per pint jar, 1/4 tsp per quart jar (optional for cucumbers, beets)

Vegetable Options
  • Cucumber, wash, cut in half, cut to fit into jar
  • Carrots, wash, peel, cut in sticks, boil 1-2 minutes, plunge into cool water, drain
  • Cauliflower, wash, chop into pieces, boil 1-2 minutes with slice of lemon, plunge into cool water, drain
  • Turnips, wash, quarter, boil 1-2 minutes, plunge into cool water, drain
  • Beets, wash, chop, 1/4-inch slice, boil 1-2 minutes, plunge into cool water, drain (store by themselves-- turns the juice pink)
  • Green Beans, trim ends, wash, boil 1-2 minutes, plunge into cool water, drain
  • Daikon Radish, peel, slice into half moons, boil 1-2 minutes, plunge into cool water, drain
  • Asparagus, trim ends, wash, chop, boil 1-2 minutes, plunge into cool water, drain
  • Garlic, boil 1-2 minutes, remove peel and separate cloves
Directions
  1. Clean and prep vegetables.
  2. Add pickling spices and vegetables to jar(s). 
  3. Bring pickling juice ingredients to boil over medium heat, stir until sugar and salt dissolve.
  4. Pour hot liquid over prepared vegetables in clean jars. 
  5. Add pickle crisp (if using) to each jar of cucumbers, beets, etc.
  6. Label jar.
  7. Wait about 30-45 minutes before eating. Store in the fridge up to 10 days.


Tuesday, July 15, 2014

Red Raspberry Jam

I trekked out to the Chesterhill Produce Auction where I quickly became the owner of twelve pints of raspberries. What to do with so many berries? I'm making jam! 

Raspberry seeds are a natural thickener, but to bring out the pectin naturally in the berries, first bring the berries to a simmer and then add the sugar.  

A weight scale gets consistent results versus the measuring cup method. I use a metric scale I purchased in Japan, but  the ounces are also provided.

This looks beautiful, all shiny and red, plus it tastes awesome!

Red Raspberry Jam
Adding the whole raspberries at the end of the cooking process gives you a nice chunky jam. Using the ratio of 1:2/3 cup (berries to sugar) allows the ripe fruit taste to come through.  Estimate about 2 pints of berries for 1 pint of jam. Yields 6 pint jars.

Ingredients
Fresh Ripe Organic Raspberries, 1500 gm (53 oz) = 1125 gm (40 oz) + 375 gm (13 oz)
Granulated Sugar, 1000 gm (35 oz)
Optional add 3 drops of essence of violets at the end of the cooking process 

Useful Equipment
Long handled spoon
Large heavy bottom Dutch Oven
Mesh skimmer or spoon to skim off foam and small bowl of water to dump the foam
Jars for canning with lids and bands
Canning Pot for water bath 

Directions
Place metal spoons or plate into freezer.

Wash inside and outside of canning jars with lids and bands (estimate a pint jar per two  pint of berries). Bake the open jars at 250ºF (121ºC) for 30 minutes. In a small pot over low heat, simmer the lids until needed. Lay out a clean cloth to wipe jar rims after filling. 

Pick over the fruit and discard any unripe berries, stems, leaves, critters, or mold. Fill a bowl with water and swish the berries around-- prevents damage from the faucet's stream to the delicate fruit. Arrange in a single layer on a paper towel-lined baking sheet to prevent bruising and dry.

Set aside a quarter of the berries, 375 gm (13 oz), near the stove to add at the end.

In a large heavy bottom pot with a wide rim such as a dutch oven over low heat, add berries, 1125 gm (40 oz). Occasionally sitr to soften the fruit and draw out the pectin until it comes to a simmer,  5 to 7 minutes.

Continuing over low heat, add the sugar and stir into berries until dissolved, 1 to 2 minutes.

Increase heat (medium high to high depending on the heat source) to boil rapidly. Stir frequently to prevent sticking, until the jelling point is reached, 15 to 20 minutes- see the next step below. Skim foam off the top as needed. 

After 15 minutes begin to test for the jelling point by placing a bit of the hot jam onto a spoon or plate from the freezer. If the jam runs, continue to cook and recheck after a minute, if the jam runs in a sheet and crinkles when pushed up, the jelling point has been reached.

Add remaining whole berries. Return to boil on high until translucent and just hold their shape, 1 to 3 minutes. Remove pan from heat. Let jam settle. Skim off any foam, being careful not to disturb the jam underneath. Allow to cool and thicken to let the whole fruit pieces to remain disbursed, about 10 to 12 minutes.

Ladle warm jam into clean sterilized jars with a 1/4-inch of head space. Wipe rims with clean damp cloth. Apply lids and seal with bands-- tighten bands to just finger tight. 

Place jars in a pot with a rack and enough water to cover the jars by about an inch. Bring water to boil and process for 5 minutes. Start the timer when the water begins to boil. Refer to manufacturers instructions for specific canning details for either the waterbath or oven method. 

Remove jars from water and place on surface to cool (wood, folded cloth, newspapers, silicon mat, etc.). Tighten the bands. Allow to sit undisturbed for 24 hours until cool. With a permanent marker, label the lids with the date and contents. 

Check the seals the following day. Any unsealed jars must be used within a few days and stored in the fridge. Store jars in a cool dry place. Use jam within 1 year.


At the Table
Use jam with bread, sandwiches with brie, french toast, oatmeal, yogurt, scones, waffles, salad dressing, etc.

Thursday, April 10, 2014

Homemade Nutella (No Palm Oil)

Kiddos, like other consumers, impact the world by their choices. A research project on Bornean Orangutans, an endangered animal, lead to the realization that orangutan habitat is being destroyed to make room for mono-plantations of palms, for the palm oil, in South East Asia. This led to some label reading and the discovery that the beloved nutella was made with palm oil (20% from what I gather).

Not wanting to eat palm oil, led to researching palm oil free nutella recipes. This one is by Adrien Gontier, a French geochemistry student that gave up palm oil and was featured on PRI. Palm oil is in many products beyond foods-- soaps, shampoos, etc. This is going to make selling Girl Scout cookies interesting. In the meantime, I'm hoping to find a sustainably harvested kind of nutella and there are a few jars stashed in the pantry to finish off.

Consider that beyond health concerns, palm oil usage in processed foods is destroying unique habitat. Saving habitat and avoiding palm oil is a choice that will impact more than a momentary cookie break or the fifteen minutes you spend making your own spread, reading labels, and making choices that matter.


Homemade Nutella (No Palm Oil)
Powdered Milk, 25 gm (~1oz)
Cocoa Powder, 60 gm (~2.5 oz)
Powdered Hazelnuts, 95 gm (~3 oz)
Agave Syrup, 100 gm (~3.5 oz)
Sugar cane syrup: (50 g water et 100g cane sugar) = cane syrup made with 3.5 oz cane sugar and 1.75 oz water

Directions
Mix all ingredients together and eat it on bananas, bread, or with a spoon.


Thursday, September 5, 2013

Chile Verde

I first ate Chile Verde (pork chunks floating in a sauce made from tomatillos, garlic, and peppers) at a small roadside Mexican restaurant on a trip up the Oregon coast. My husband and I found it on the menu, and it was so good, we stopped at every Mom & Pop Mexican place we spotted thereafter.  This was then followed by a tomatillo blackout and two years in the Middle East. The taste of tomatillos has called me ever since. A recent foray at the Athens Farmers Market reminded me of this dish.

Making the tomatillo sauce and then storing it in the fridge or canning it, later makes for a quick, delicious dinner, assuming you're into mixing it all together and letting it simmer while you nibble guacamole and sip a brew.

Recipe Notes: I cooked this for a low-heat tolerant crowd, using a mix of mild to medium peppers roasted whole over a wood smoked grill. The skins were then peeled and the seeds removed (thanks Jane). The pork comes out fork tender and the sauce has a tangy bang with a smoky flavor. It was served with potatoes boiled whole, quartered, and fried with skins on because I have skinny kiddos that could use some fattening up, and they love rice and fried potatoes. I noted the adults happily added a side of potatoes to their plates and, let's face it, fried potatoes swirled in chili verde sauce is marvelous. A word of advice, wear gloves to handle jalapeños-- the oil burns your skin and is hard to stop (Aveda Eye Make up Remover proved helpful).

Chile Verde
Tomatillos, 2 pounds (2 quarts), peel, core, cut in half
Mild to Medium Peppers, 2 to 3
Jalapeño, 1 (more if you like heat) but wear gloves when handling
Garlic, 3 cloves, skin on
Water, 2 cups
Olive Oil, 4 Tbsp
Pork Shoulder Roast (bone in gives more broth flavor), 3 ½ to 4 lbs, trim excess fat, cube
Salt
Freshly ground black pepper
All-Purpose Flour, ~¾ cup
White Wine, ¼ cup
Cumin Seed, 1 tsp
Coriander, 1 tsp
White Onion, 1 large, chopped
Water or Chicken Stock, ~4 cups, enough to cover the meat
Salt, 1 tsp +
Freshly Ground Black Pepper, 5 to 6 cranks +
Fresh Cilantro, 1 bunch, rinsed, drained, & chopped

Remove papery husks from tomatillos, rinse, cut in half, and place cut side down on a baking sheet, lining it with foil for easier cleaning.

Place tomatillos, peppers, & garlic under broiler (or smoke them over a grill if you can) until the skins are browned or  lightly blackened, about 5 to 8 minutes. Remove from oven. Allow to cool for easier handling.

Remove blackened skins from peppers and garlic. Remove ribs and seeds from peppers. Use gloves to handle jalapeño(s).

Place tomatillos, skins included, into food processor or blender. Add peppers and garlic. Blend in small batches until smooth, adding water. The sauce can then be stored in the fridge until ready to use about a week or canned for longer storage (make quadruple the recipe or more if canning and follow instructions for canning). Recipe makes about 1 quart of sauce.

Season pork cubes generously with salt and pepper. Dreg in flour.

In a dutch oven over medium high heat, warm olive oil. Working in batches so as not to crowd the pan, brown pork cubes on all sides. Set aside.

Add cumin and coriander seeds and cook until spices begin to pop. Add chopped onions , reduce heat to medium low, and cook until softened, about 5 minutes, stirring occasionally. Deglaze the pan with wine, stirring the bottom to get up the bits. 

Add back the pork, tomatillo sauce, and enough water or stock to cover the meat about 2-inches. Season with salt and pepper. Bring boil over medium heat, reduce heat to low for a slight simmer until the pork is fork tender and sauce is thickened and reduced, 2 to 3 hours uncovered, stirring occasionally.

Adjust salt & pepper to taste . Garnish with fresh chopped cilantro. Serve with rice, beans, monterrey jack cheese, and freshly made tortillas or fried potatoes.


Making chile verde

Monday, August 26, 2013

Concord Grape Jam

My slippers slapped the front sidewalk as I ran out to my husband distracted with lawn maintenance. Holding a quart sized jar  glistening with my dark purple prize, I offered him a spoonful of my first homemade grape jam. His face reacted to the skins in the jam-- his grandma always made grape jelly. "But the flavor!" I demanded. I'm a jam kind of girl; I like a little chew. It wasn't that difficult to squeeze all the bits out of the grapes; it was kind of fun in a morbid play with your food kind of way. I'd still vote to leave the skins-- I'm certain there is some health benefits to them since that is also where wine derives its beneficial usage.

The recipe is from Rachel Saunders' The Blue Chair Jam Book. Check out her blog too. I love all of her jam recipes as she infuses them with herbs and has beautiful pictures and tells you about testing for doneness. I weigh my fruit on the scale, use my algebra skills to determine the ratios for fruit, sugar, etc. It works for me. This is a slightly modified version of the recipe in her book.

You've got to try this. You'll be ready to start jamming and canning full blown after two bites.


Concord Grape Jam
I bought Rachel Saunders’ The Blue Chair Jam Cookbook when I was in Japan. I didn’t have access to the variety of fruits that are here in Ohio. One of the delights of this summer was that I could finally make my own grape jam. Please note this isn’t jelly. This recipe is adapted from Rachel Saunders.

Ingredients
Concord Grapes, 4 pounds (1814 gm)
White Cane Sugar, 2 ½ pounds (1134 gm)
Lemon Juice, freshly squeezed, 3 oz
Orange Zest, ½ of an orange, finely zested
Orange Juice, freshly squeezed, ½ oz
  1. Using your fingers, gently squeeze the flesh from each grape into a pan. Be sure to catch all of the juices as well. Set the skins aside in a large pot.
  2. Over medium heat, bring the grape innards and juices to a simmer. Cover and cook until soft, 3 to 5 minutes. Force the pulp through a fine-mesh strainer or chinois. Discard the seeds.
  3. Add the seedless pulp, sugar, lemon juice, orange zest, and orange juice to the grape skins. Stir frequently and bring to boil over high heat. Cook until jam is glossy and thicker, about 20 to 30 minutes, but test the jam. However, if you want to remove the skins, do so after about 10 minutes of cooking by running the slightly cooled liquid through the fine grade of a food mill or some other kind of strainer. Pour the strained liquid back in the pot, return to a steady boil and check the jam consistency after about 10 minutes to every few minutes after, until it reaches the desired consistency via the jam test.
  4. To test the jam, do a saucer test or I put a stainless steel spoon rest in the freezer, drop some cooking jam on it, stick it back in the freezer for 3 or 4 minutes and then feel the jam with my finger. If the jam is neither warm nor cold then it is the right temperature. If it’s thickened to a spreadable consistency, it is done. Cook another minute and skim off any white foam from the surface.
  5. Pour jam into sterilized jars and process.


Friday, August 9, 2013

Trailing Spouses & Pickled Garlic

Small college towns like Athens, Ohio, can have a hard time recruiting professionals. Trailing spouses may not be able to find jobs, shopping, or some other such things. I listened to a recent conversation about the loss of a professional recruit due to a dissatisfied spouse with some amusement.

I've been the trailing spouse for a good while due my husband's Navy career. Settling down, anywhere, was my only request after twenty years. I've easily adapted to life in Athens just like I've done at every other place. Only now I can plan for longevity, whatever that proves to be.

What's not to love in Athens? We've got produce auctions, a local music scene, a farmers market, locally brewed beer, horses, gardeners galore, summer band concerts, a lake, hiking trails, and you can even walk uptown, depending upon where you live, and do something like watch an art film, take music lessons, go ice skating (in the winter), or attend a festival.

Today I worked on my Chesterhill Produce pile. I made nine pounds of Shiro Plums into jam and pickled eight bulbs of garlic, my first attempt. As I stirred the various pots, I have to admit that Shakespeare's Macbeth came to mind.

Double, double toil and trouble;
    Fire burn, and caldron bubble. 

Fresh garlic is sticky. I'm used to dry papery garlic bulbs that have sat on supermarket shelves. Dunking the bulbs into boiling water for less than a minute makes the cloves easier to peel. It also prevents fresh garlic from turning an unappetisizing green when steeped in vinegar. I also put some cloves of garlic into olive oil for future comparisons (both work). Now I've got to finish making pesto.

Turns out that the professionals that stick tend to have some exposure to Athens, like my husband who grew up here and chose (plotted?) to return. They remember the laid back life style, the hills,  the time people have here to do things like pickle garlic. The joys of Athens.

Pickled Garlic
Makes 1 Pint Jar
New Garlic, 1 lb or enough to fill a pint jar (~8 bulbs)
Fennel Seeds, 1 tsp
Peppercorns, 12 (I'm guessing black ones, but I only had pink)
Bay Leaves, 4
Apple Cider Vinegar, 3/4 cup + 2 Tbsp
Granulated Sugar, 1/4 cup
Pinch of Saffron Threads

1. Wash a pint jar with a lid and screw band. Put jar, top up, in the oven with the lid off at 250ºF (121ºC) for 30 minutes. Lay out a clean cloth to wipe the jar.

2. Bring a pot of water to boil over medium heat. Plunge the garlic bulbs into boiling water for no more than a minute. Drain and pat dry. Separate the cloves and cut off the tips at each end. Peel the cloves.

3. Pack cloves into a sterile jar. Add fennel, peppercorns, and bay leaves.

3. In a non-reactive saucepan, boil vinegar, sugar, and saffron. Pour hot vinegar over garlic and insure that the garlic is completely submerged in the pickling liquid. Seal the jar with a vinegar lid. Refrigerate and mature for 1 month before using. Good for 2 years refrigerated.

Serving Suggestion: Use instead of fresh garlic or eat it on its own.

Pickled Garlic

Sunday, August 4, 2013

Pickles, Sustainability, & Twinkies

It started with making pickles and a visit to the barber. My husband told the barber about my pickle experiments and the barber told my husband about a hardware store, Lehman's, where sustainable products are available for those, like the Amish, who stay off the grid can find old fashioned pickle jars from Germany, nonelectric appliances, compostable toilets, and hand tools. A few days later we were passing horses and buggies as we neared the shop’s grounds.

Before me was a whole new ballgame. Inside, horse drawn carriages can be bought along with every kind of canning supply, wood burning stoves, off the grid refrigerators, and large copper cauldrons for making apple butter. Up to this moment, the ideal washing machine was a stainless steel front loader that can be fully stuffed and plugged into the wall. I was in the grip of products that utilize only human power.

I use cloth napkins, line dry laundry, and buy local as I can get food which can be farm to table here. Our home improvements (to a 1910 house) have included energy efficient appliances, double paned windows, and foam insulation. Our wood burning stove looks like a fireplace, but is designed for efficiency to burn hotter and radiate heat into the room. However, seeing that life can be off the grid but not camping took over my imagination at a whole new level.

I will not likely ditch my current home and life. Searching for ideas on sustainable practices, I turned to Pinterest and created a pin board titled “Unabomber Shack," before I realized this was probably not the greatest heading. Doomsday planning feels negative and off-putting. Instead, I looked for ideas like “Sustainable Living, Passive House, and Off the Grid Living." There are some interesting products, ideas, and options for those who are willing to go even part way. My board is currently titled, "Eco, Green, Sustainable."

We passed a number of windmills on our drive to Chicago. I can't comprehend the resistance to green energy and making changes to the electric grid in the States which would serve all Americans with the benefits of renewable energy, less environmental destruction, and cleaner water, air, etc. Combined with products that demand less energy, wind power (and other forms of renewable energy) feels like a win for the everyman. In the museums, Science + Industry and the Field, displays of bygone cultures that lived in harmony with the environment spoke of modern life's destruction of habitats, the changes from hunter gathers to farmers, the rise of strong leaders that created great works like the the pyramids of Egypt, earthworks by American Indians, and temples in Mexico. We could build equally wonderful works and systems that enhance the lives of all, but instead community resources are more often marshaled for sport's complexes. From our coal mine tour, at Science + Industry, we were directed to the Twinkie display made from coal byproducts. The Twinkie is a testament to our ability to preserve food, born October 8, 2009, it has a birth certificate on display next to it. It looks marvelous,

Canning and preserving the produce from farmers and my own garden is a step toward sustainability that I can control. The work and the connection to the seasons is enjoyable if at times, time consuming. On the plus side, there is something about vinegar in vegetables that makes them wake up and sparkle in your mouth.

There isn’t room for the windmill composter in my backyard so I’ll still be tossing compost with my pitchfork. However, there is a pressure canner waiting for me to push fear aside and save for the season as well as an old fashioned pickle jar fermenting in the basement.

Twinkie born October 8, 2009 on display at Science + Industry Museum

Wednesday, July 10, 2013

Pickled Asparagus

As a small child you would not have found me lurking about a pickle barrel or snitching sauerkraut from the basement. The first time I ate a sweet bread and butter pickle, by accident, I took note and thereafter looked for them. The first time I bit into an umeboshi sour plum pickle in Japan, I stopped amid conversation to clarify what I had just eaten. Pickles have surreptitiously entered into my diet.

Exploring ways to preserve and keep abundant summer garden and farmers market produce, pickles and canning are a new pursuit. With the help of Well-Preserved: recipes and techniques for putting up small batches of seasonal foods by Eugenia Bone, I made Pickled Asparagus, and it is fabulous! See the book for details on the water-bath method of canning and for additional recipes. She also provides recipes for using the pickled items.

Canning is a lot about being organized in the kitchen. Start with getting your canning gear in place. By this I mean wash the jars and lids. Read up on technique. I've tried the water bath and the oven method. I prefer the dry heat of the oven method so far. Have a damp cloth for wiping the rims and labels handy. Please defer to an expert resource for canning tips.


Pickled Asparagus
Makes 3 Pint Jars

Asparagus, 5 lbs (2268 gm)
Water, 2 1/4 cups
Distilled White Vinegar with 5% acidity, 2 1/4 cups
Pickling Salt, 1/4 cup
Dill Seed, 1 tsp
Hot Red Pepper Flakes, 1/2 tsp
Whole Allspice berries, 1/4 tsp
Cumin Seeds, 1/4 tsp
Coriander Seeds, 1/4 tsp


1. Wash 3 pint jars with the lids and screw bands. Put jars, tops up, in the oven with the lids off at 250ºF (121ºC) for 30 minutes. Lay out a clean cloth to wipe the jars and an absorbent pad (silicon mat lined pan, towel, or layer of newspapers) to place the hot jars after processing.

2. Trim the asparagus ends off so that they allow 3/4 to 1-inch of headspace in the jars. Over medium to high heat, bring a pot with about 2-inches of water to boil.  Cook the asparagus, in small batches, until bright green, about 3 minutes. Remove asparagus and run under cold water or dunk them in ice water to set their color. Drain and set aside. Repeat with remaining asparagus.

3. Prepare the vinegar solution. Combine water, vinegar, salt, dill seed, pepper flakes, allspice berries, cumin seeds, and coriander seeds in a saucepan over medium to low heat. Stir to dissolve salt, but do not boil past the point the salt has dissolved. Remove from the heat.

4. Pack the asparagus into the warm jars tightly, tips upright. Cover with the vinegar solution leaving 1/2 to 3/4-inch of headspace above the vinegar solution. Distribute the spices amongst the jars. Wipe the rims, set on the lids, and screw on the bands to fingertip tight.

5. Process the jars by baking them in the oven at 250ºF (121ºC) for 15 minutes or use the water-bath method and process accordingly for 15 minutes.

6. Remove jars from the oven. Place them upside down to cool. Check the seals to be sure they sealed. Tighten the bands as needed. Label and date.

7. Allow the asparagus to season in a cool dark place for 4 weeks (or overnight). Refrigerate after opening. The asparagus will become paler and float in the vinegar as they do shrink during processing so pack them tightly. Using proper canning methods, you can store these for up to one year. They've yet to last a week around here.

Serving suggestions:
Eat out of the jar, add to salads with hard-cooked eggs and vinaigrette, or add to Chicken Piccata.

Pickled Asparagus


Wednesday, March 27, 2013

Time Sucks & Vinaigrette

Time sucks? Here I mean the black holes that absorb hours of the day, where time goes somewhere else. I've got two. They are not pointless meetings, or folks who interrupt and talk off point too long, nor are they administrative tasks that accomplish nothing but cover tails, that used to be parts of my day at work.

Mine? Children and food, both of which require an inordinate amount of time-- not that I'm not willing to abandon either. However, I am open to better methods, approaches, or ideas for both. There are some things that take time and that all of us could benefit from, here I mean the food time suck.

An American friend in Japan impressed me with the number of creative adventures and activities she managed to combine with two children. She was involved in Girl Scouts, a theatrical production, she knitted prolifically, and she was writing a mystery novel. I was blown away with her productivity. While I struggled to knit yet another stockinette stitch scarf, she was turning out crazy critters full of color and whimsy with her yarn and needles. Thinking I was doing it wrong since she clearly managed to get so much more done, I asked her the question I most often want to ask everyone, "What do you cook for dinner?" Her answer? "Oh, I don't cook. We order out or eat frozen pizza." Her answer revealed two things for me. How she had time to participate in activities in the early evening and that though the option existed, I could not embrace not cooking as an answer to my own conundrum of creating more time.

I once lived on the cookings of others and relied on processed foods, but having been exposed to culinary delights in Europe, the Middle East, and Japan, I arrived at a fork in the road. I  either needed a chef or had to become the cook. I opted for cooking, and though I got into the game later in life, I'm a full-fledged junkie now. I cook, for better or worse, breakfast, lunch, and dinner at my house. Turning back is not an option.

Food that stirs my passions, gets me into the kitchen. I cook what interests me. Still there are shortcuts I could learn or recipes I might try, but food sits at the center of my day. I didn't inherit a repertoire of tricks and tips. My grandmothers both cooked for their families, but in their later years accepted the labor saving offerings at the grocery stores to some degree. They made their own pie dough, but sometimes used fillings from a can. They tried boxed mashed potatoes often enough that as a kid, I tried to avoid having to eat them. Salad dressing, pudding, and cereal were all national brands served at the table.

As a teenager in Spain, I was blown away by the taste of olive oil and vinegar. Why did we ever drift from homemade? I know! It's the time factor we save, but we fork over our tastebuds, health, and our connection to the food on our plate. There is no zest in a bottle of Italian dressing that compares to homemade, but some how we talk ourselves into it to loosen the grip of the kitchen on our lives.

Here is why you need the food time suck: taste, health, and environment. We save ourselves time and replace it with what? Meanwhile factories make our frozen pizzas, produce a bottle of dressing, and trucks deliver it, generating wastes or efficiencies? I think my grandmas and us were slipped a Mickey. We were duped out of the kitchen and its inherit labors for food that isn't good for us or the planet.

Cooking three meals a day is easier when you eat, say, rice or tortillas at every meal. I make my own pain by trying to mix it up. I want to try everything. I do rely on staples for simplicity. I don't regularly make my own pasta. I stash homemade gnocchi in the freezer from time to time. Sometimes we go out for lunch or order pizza. My kids don't always like what I cook. This week's avoiders included sushi cake, broccoli breadcrumb casserole, and about every soup I made besides miso. I could be meaner, strictor, or I could pack it in my husband's lunch or make smaller portions, which I do. I can't live on butter pasta and yogurt to the extent they are willing. The compromise? There is a pot of salted water boiling when I sit down to eat.

I'm always in search of recipes that interest me. Maybe some day I will exclusively eat my own soup stock, pasta, and granola like I do bread, but not yet. I aim to try to get there anyway, and maybe drag a few of you with me. Being the cook is a worthwhile pursuit for all of us and each of us-- better food on the table, healthier, fresher, food to eat, a cleaner planet, more local shopping, more local gardening, and perhaps even a barter economy of trading beer for jam or tofu for bread. Get to work, be the cook!

In the meantime, here's a recipe for a vinaigrette to stash in the fridge for at will salad dining.


Vinaigrette
Serves 4
It’s always a good idea to make more salad dressing than you need! I prefer to double this recipe. Change the herbs or leave them out as you like.

Ingredients
First Press Olive Oil, ½ cup
Organic Lemon, 1 (zest & juice), 3 Tbsp (use wine vinegar if you need more)
Garlic, 1 clove grated
Oregano, ½ tsp (fresh) or 1 tsp (dried)
Salt, 1 tsp
Pepper, 5-6 cranks

What to do
  1. Whisk altogether and adjust to taste.
  2. Place into bottle and serve over greens. 
  3. Store in the fridge, but bring to room temperature before serving.
Get your own bottle & fill it :-)